In this section:
a. Installing the WooCommerce Odoo Plugin:
b. How to Navigate to the Odoo Plugins Settings
c. How to navigate to the settings Manually?
Debugging:
Installing and Updating the Plugin:
Odoo for WooCommerce now brings powerful integration with your business management software. To install the Odoo plugin, follow these steps.
Installation:
- Downloadthe .zip file from yourWooCommerce account.
- Go to: WordPress Admin > Plugins > Add New and Upload Plugin with the file you downloaded with Choose File.
- Install Now and Activate the plugin.
You need to have an Odoo Account. If you do not then review How to create an Odoo Account.
You will need to follow these settings and configure
1. Server URL
2. Database Name
3. Username
4. Password / API Key
In order to complete these steps ensure you are familiar with How to debug the Odoo for Woocommerce Plugin.
Accessing the Plugin Settings
You can access the plugin using the below-mentioned method:
- In your WordPress admin page, click on theWooCommerce>Settings.
- Click on theIntegration>ODOO Integrationand go toSettingstabto connect your website with Odoo.

a. Installing the WooCommerce Odoo Plugin:
1. Navigate to https://yoursite.com/wp-admin/
2. Click here.

3. Double-click here to "Add New"

4. Click "Upload Plugin"

5. Upload the Odoo Plugin File and click 'Install Now'

6. Click "Activate Plugin"

b. How to Navigate to the Odoo Plugins Settings
7. Click "WooCommerce"

8. Click "Settings"

9. Click "Go to ODOO Account Settings" to go to the settings using the Banner.

c. How to navigate to the settings Manually?
10. Click "Settings"

11. Click "Integration"

12. Click "ODOO Integration"

13. You are now on the Odoo Integration Settings Page.

d. Using the Odoo Connection Indicator | How to Connect Odoo to the WooCommerce Plugin to Your Odoo Account
1. Navigate to https://yoursite.com/wp-admin/admin.php?page=wc-settings&tab=integration§ion=woocommmerce_odoo_integration
2. On the Odoo Settings Page you can see the Odoo Settings Page, the Indicator can be seen on the Odoo Settings Page.
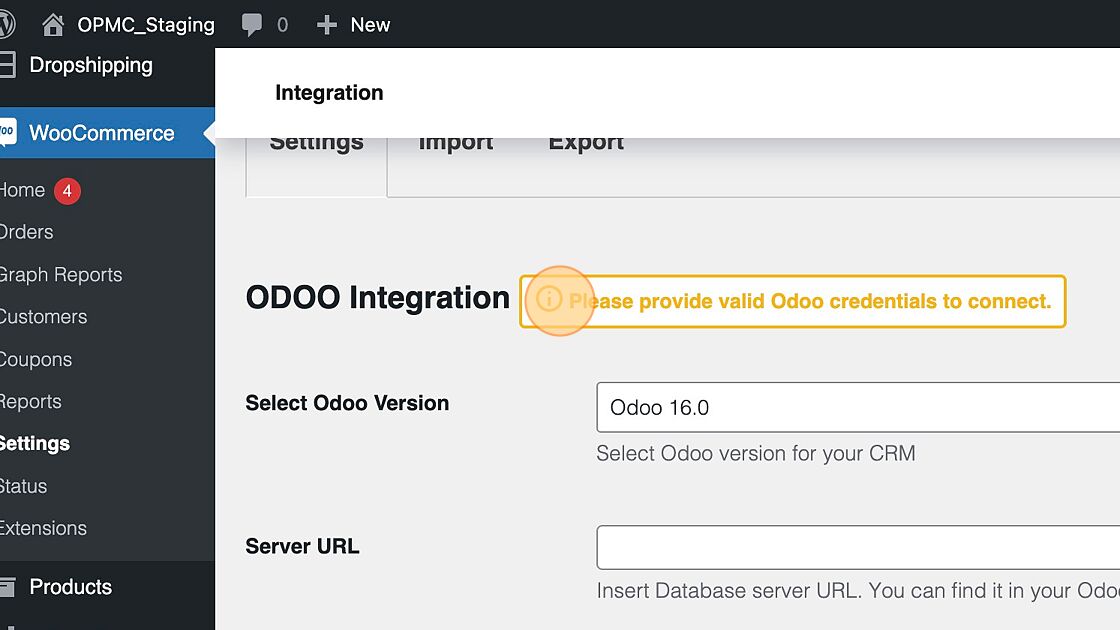
3. Click the "Server URL" field.

4. Click the "Database Name" field to enter the Database Name.

5. Click "Insert username. You can find it in your Odoo account."

6. Click the "Username" field.

7. Click the "Password" field to enter your password.

8. Click "Save changes"

9. Refresh the Page to view the indicator where you can see the updated status: "Odoo Account is Connected"

Debugging the Odoo Plugin
1. Navigate to https://yoursite.com/wp-admin/admin.php?page=wc-settings&tab=integration§ion=woocommmerce_odoo_integration
2. On the Odoo Settings Page you can see the Odoo Settings Page, the Indicator can be seen on the Odoo Settings Page.
3. Click the "Server URL" field.
4. Click the "Database Name" field to enter the Database Name.
5. Click "Insert username. You can find it in your Odoo account."
6. Click the "Username" field.
7. Click the "Password" field to enter your password.
8. Click "Save changes"
9. Refresh the Page to view the indicator where you can see the updated status: "Odoo Account is Connected"